Sunday, 16 October 2016

World Eaters vs Sons of Horus 1500 Points

This is my first match of the Betrayal Campaign we are playing.
We are currently in the Phase I: The Ashes of Treachery, which means:
  • loyalist can get 3 fortifications as allied detachments
  • traitors can leave infantry, jump infantry or walkers in reserves and use Deep Strike. Additionally, in the same turn they appear, they can assault.
We decided the battle would be World Eaters, Traitors, vs Sons of Horus, Loyalist, for 1500 Points.

Sons of Horus Army


Since I got the Knight I have wanted to try it in battle, so I decided I will use it, even though I believe 1500 Points is not enough points to spend 375 on a Knight.

The Army consist of:
  • Consul with Combi-weapon, melta bombs and artificer armour
  • 2x 15 Tactical Squad with Vexilla and Sargent with melta bombs
  • 2x Apothecary
  • 6 Tactical Support Squad with Plasma Guns in Rhino
  • 2x Cortus Dreadnought with Kheres Assault Pattern Cannon
  • Paladin Knight
The Warlord trait was Child of Terra.
Sons of Horus Army

World Eaters Army

The Army consists of:
  • Praetor with Paragon Blade, Power Fist and artificer armour
  • 8 Tactical Squad, Sergeant with artificer armour
  • 10 Tactical Squad, Sergeant with artificer armour
  • 10 Tactical Squad with Chain axes and bolt pistol
  • 1 Apothecary
  • 5 Cataphractii Terminators with 2 chain fist, 1 power weapon
  • Dreadclaw
  • Deredeo Dreadnought
  • Contemptor Dreadnought with Multi-melta
  • Deimos Pattern Vindicator with Laser Destroyer
World Eaters Army
The Warlord trait was Child of Terra.

Battle


We rolled for mission and we got Blood Feud. The deployment setup was to be on two long sides of the table.
I won the roll, so I decided to place my troops first and then take the first turn, unless he seized the initiative.

Deployment


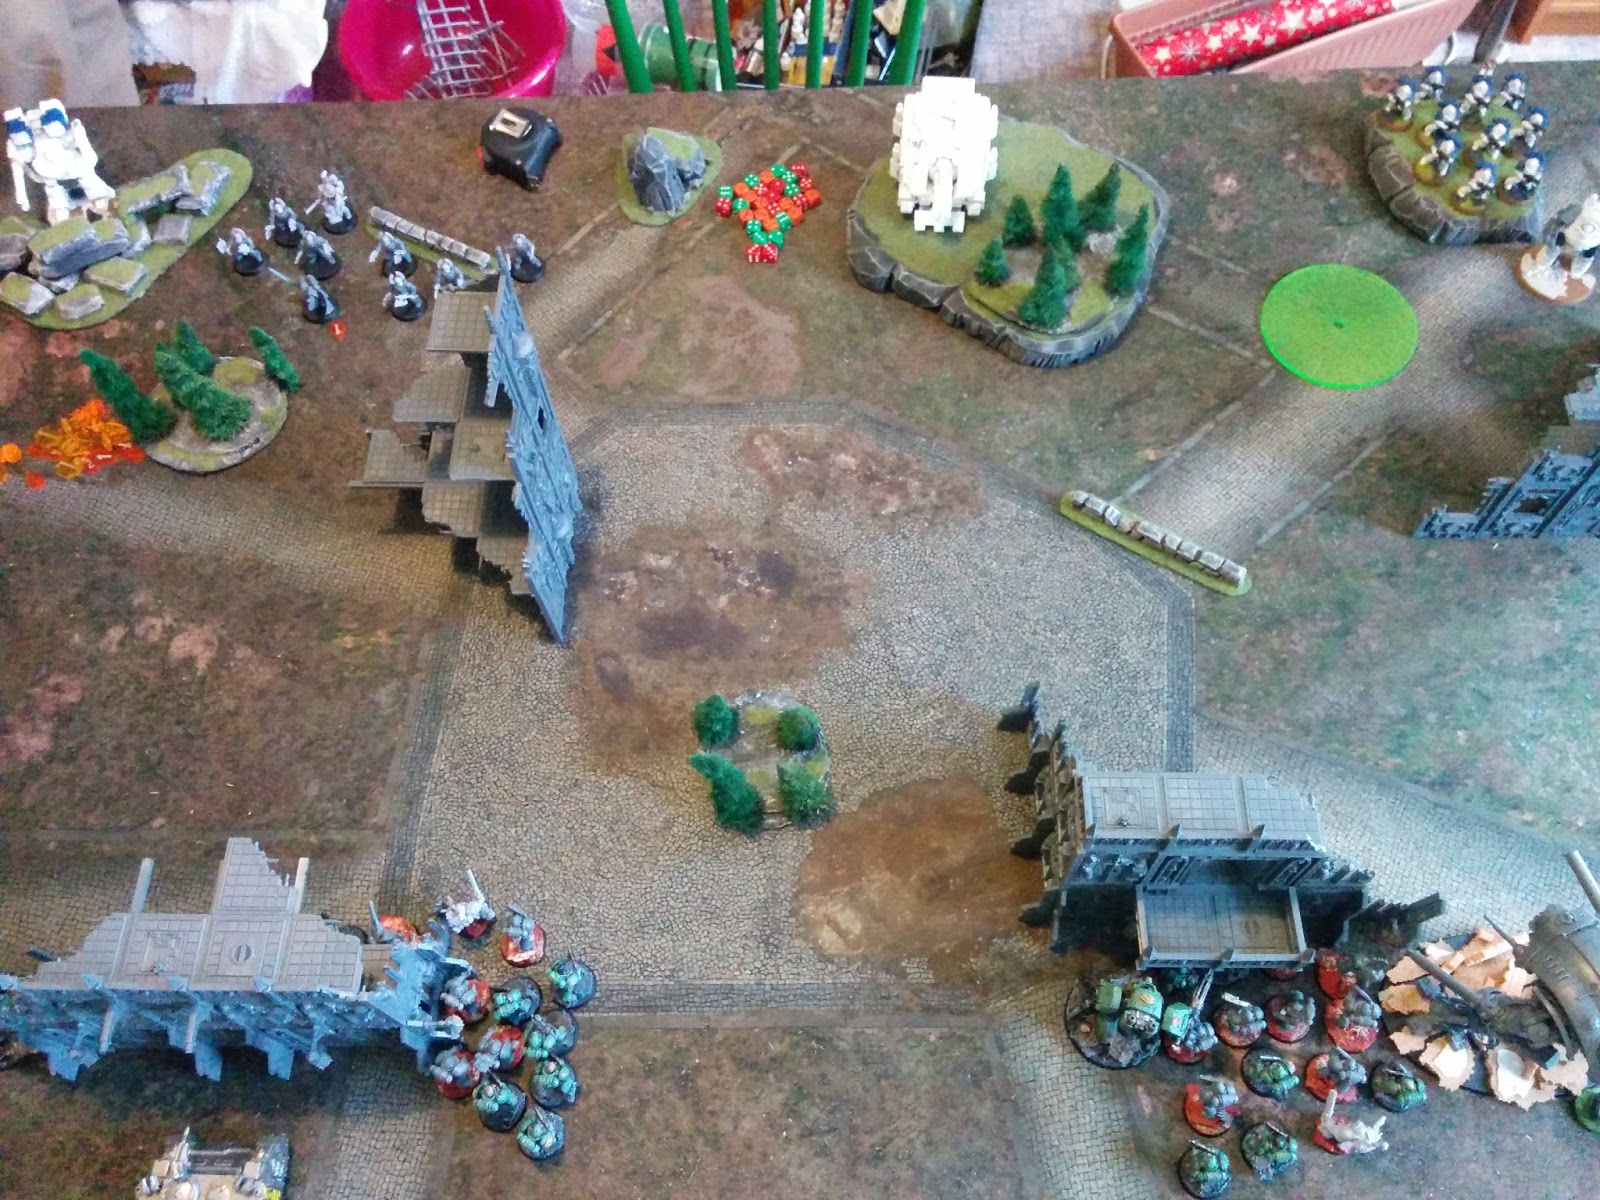
My basic plan was to place one squad and dread in each side of the table, Rhino in cover to react to any Tank or Termi threat and the Knight to shoot anything that it can.
This is the deployment, as you can see, two big blocks, each one behind a big building.

Loyalist deployment

This was his deployment. The Dreadclaw was in reserve to make a Deep Strike attack. Then a squad in each side, supported by either the Deredeo or the Vindicator. The squad with the Praetor would advance to tear apart anything placed in their path.

Traitor deployment

Turn #1


He did not seize the initiative so I got to start.
The first turn was easy, just advance with both units to the cover and place the Knight with line of sight to his troops.
Turn#1 the Knight wipes out a complete squad!

The shooting phase was quite successful as the Knight wiped out a complete unit, that was standing next to the Vindicator. Sons of Horus get the first blood!
Then it was up to his first turn, and here already the problems started!
In his shooting phase he throws everything that can shoot towards the Knight, that saves all possible attacks and stands still.
Then as expected, he made a Deep Strike with the Dreadclaw as close to the Knight as possible. It was scattered 10" backwards, so I had a bit of hope... but then the Terminators were able to move and assault just enough to get in touch with my Knight... two Chainfists incoming!
As I was fearing, the Terminators killed the Knight, that failed to kill any Terminator in return. Then it exploded with an Apocalyptic Mega-Blast Template (great name) and killed two Terminators and one Space Marine. The terminators consolidated towards my Tactical Squad.
What a turn! We are just starting and the Knight is out... this does not look nice for the Sons of Horus.

End of Turn#1 the Knight is dead!

Turn #2


Beginning of Turn #2
In the second turn I decide to advance full speed with my Rhino towards the Deredeo, as it does not make sense anymore to try and defend the non-existent Knight!! Then I make the second big mistake of the game, which is advance with the tactical squad on my left flank and take positions for a possible Fury of the Legion on my next turn.
On the right side I shoot with everything at the Terminators and wipe them out of the table, vendetta for the Knight!

Turn #2. Terminators are killed
My opponent then decides to fly over my tactical squad with the Dreadclaw, that manages to kill two marines (with S5 AP5!). Then advances on my right flank with the Dread and squad.

On my left flank I pay dearly for my previous mistake. He advances with the Praetor and his squad, and then assaults my unit, because of my movement, they are just too close. Then of course the insane amount of attacks just kills everyone on the squad, and then they consolidate, after bathing in the blood of the Sons of Horus. Sorry, no pictures for this one, but you can see the result of this Assault in the turn 3 pictures. The Praetor has only one wound left, but it seems there is nobody alive who can kill him on this flank.

Additionally the Deredeo shoots against the Rhino and manages to immobilize it, so the squad with Plasma cannot get any closer!
There it goes any hopes of destroying the Deredeo.

Turn #3


Although it seems that all is lost, as only two Dreads, one Squad and a Rhino is left, the Sons of Horus keep on fighting.

Beginning of Turn #3, right flank
Beginning of Turn #3, left flank
At this point of the battle, my goal was to try to kill as much as I can in order to make some points for the Campaign.
On the left flank the Plasma Squad goes out of the Rhino and then shoots at the Praetor and his squad, wiping all of the marines, but the Praetor still stands.

The plasma squad wipes out a few World Eaters

On my left flank I put the squad on the building to get a 4++ cover and move the Dread towards the left to shoot at the Praetor. The squad cannot shoot as they did Fury of the Legion in the previous turn.

Right flank takes cover on the building
My opponent is just cleaning up the board in this turn.
He turns the Deredeo towards my remaining Dread and destroys it. Then shoots all of his right flank against my squad, that somehow manages to survive.
On the left flank, the Praetor assaults the plasma squad and I manage to kill two of my marines during the oberwatch shoot, so all the Praetor needs to do in the assault is kill the remaining three. It was really a pity that 10 plasma shots were not able to deliver a single wound to the Praetor!
We are headed for the last turn of the game...

End of turn #3: a single Sons of Horus squad remains

Turn #4


It is my last turn, I only have one squad and a Rhino left.
I make a Fury of the Legion shooting on my right flank against the World Eaters killing roughly half of them.
Turn #4 and the last Fury of the Legion of the game

My opponent assaults with the Dread on my right flank and wipes out the whole squad.
On the left flank, the Rhino is destroyed by the Dreadclaw.
The game is finished with an absolute massacre for the World Eaters!

Turn #4 the last Sons of Horus squad is wiped out

End of turn #4

Result

Once again it has become even more clear, if possible, that the battles in Horus Heresy are short and brutal. In this one even on turn one there was massive destruction. One whole squad and a Knight. By the end of turn two, the battle was already decided, and turn three-four is just about wiping out the remaining units.

For me it is still a re-learning exercise, as I am new to Horus Heresy and I have been out of the gaming area for more than five years... I still believe that two big squads is a must, as they can hold their ground, but they must remain at a distance, in order to benefit from their firepower with Fury of the Legion. I was quite happy with the plasma and Rhino combination.

Next steps for me are, finish building my Terminators to add a bit of close combat capabilities, and decide which Tank I should buy to add more firepower.

Although it was a clear defeat for the Sons of Horus, we checked the result for the Campaign using the Victory Points.
It was 18 for the Traitors vs 9 for the Loyalists.

The Campaign results so far are:

  • four battles played
  • two wins for the Loyalist, two for the Traitors

Campaign results


Emperor's Children (Loyalists) vs World Eaters (Traitors)
Scenario: Blood Feud
Result: Traitors 6, Loyalists 16

Emperor's Children (Loyalist) vs Emperor's Children (Traitors)
Scenario: Onslaught
Result: Traitors 10, Loyalists 1

Emperor's Children (Loyalist) vs Emperor's Children (Traitors)
Scenario: Shatter Strike
Result: Traitors 0, Loyalists 6

Sons of Horus (Loyalist) vs World Eaters (Traitors)
Scenario: Blood Feud
Result: Traitors 18, Loyalists 9

Monday, 10 October 2016

Warlords

This will be my last post with newly painted skavens until I get my claws into the remaining ~20 to finish up the Army.

I am adding two Warlords to the Army, in 3rd ed. they are 117 points each and in 4th ed. 90. Anyway you can only have one of these in the Army, so I must use the other as a Chieftain or Champion.

The first one is a Classic Model with halberd, the same one as one of the very first models I painted.


You can compare it to the first one I painted, in 2015. I think the glow effect looks better in the new one.


This other model is one of the few miniatures from newer editions that I have in the Army.
I saw it in a second hand shop and I simply liked it so much that I decided to buy it to lead my Stormvermin. That is why I have painted it in the same scheme.
I really like how the severed Dwarf head has turned out. I have used the same blood technique I mentioned when painting Konrad Curze.

Both are painted in 2016.


Monday, 3 October 2016

Clan Skryre Chieftains

I had two more Chieftains laying around so I decided to paint them as Clan Skryre just because I really like the paint scheme.
Can be used of course as any other Clan.

This adds 28 points for each level 5 Chieftain in 3rd ed. and 59 in 4th ed.

Painted in 2016


Thursday, 29 September 2016

Choque de Legiones

Para ir cogiendo un poco de práctica de cara a la campaña del libro Betrayal, jugamos una partida del bando leal contra el traidor.
Como la campaña la jugamos seis, decidimos jugar a 3000 puntos por bando, llevando cada uno 1000 puntos. Cada bando sólo tiene un Warlord.

En el bando leal teníamos Guerreros de Hierro, Hijos del Emperador e Hijos de Horus.
En el bando traidor Devoradores de Mundos e Hijos del Emperador.

Bando Leal


Hijos de Horus
  • Cónsul (armadura artesanal, combi-bolter, bombas fusión)
  • 2x Apotecario
  • 2x 20 marines con Vexilla y Sargento con armadura artesanal, combi-fusión y bombas de fusión
  • 6x Escuadra de armas pesadas con Bólter pesado
  • Cortus Comptentor con Cañón de Asalto

Guerreros de Hierro
  • Cónsul Master of Signal con armadura artesanal
  • Centurión Cataphractii Siege Breaker
  • 2x Escuadra Táctica de 10 marines, sargento con bombas de fusión
  • 4x Iron Havoc con lanzamisiles
  • 5x Tyrant Siege Terminators

Hijos del Emperador
  • Centurión con armadura artesanal, jump pack, bombas de fusión y Sonic Shrieker
  • 5x marines  tácticos con volkites en Rhino
  • 5x marines tácticos en Rhino
  • Cortus Contemptor con dos Multi-Melta
  • Whirlwind
  • Land Raider Proteus
  • Predator

Bando Traidor


Devoradores de Mundos
  • Cónsul Master of Signal con bombas de fusión
  • Praetor (cataphractii, Combi-weapon, Chainfist) Master of the Legion, Pride of the Legion
  • 4x marines tácticos con rifles de plasma, sargento con armadura artesanal, bombas de fusión
  • 4x terminator (2 power fist, 2 chainfist)
  • 4x terminator (2 power fist, 2 chainfist)

Devoradores de Mundos
  • Centurión con armadura artesanal, Charnabal Sabre, bombas de fusión
  • 12x marines tácticos, vexilla. Sargento con armadura artesanal y bombas de fusión
  • 11x marines tácticos, vexilla. Sargento con armadura artesanal y bombas de fusión
  • Dreadnought Contemptor con Cañón Asalto Kheres
  • Dreadnought Deredeo con Aiolos Missile Launcher
  • Legion Vindicator con Laser Destroyer Array

Hijos del Emperador
  • Cónsul 
  • Palatine en Rhino
  • 10x marine táctico con vexilla
  • 10x marine táctico con vexilla
  • 5x marine táctico con rifle de plasma
  • Dreadnought Contemptor twin-linked Autocannon
  • 5x Cataphractii
  • 3x Scimitar Jetbikes

Táctica

Yo jugué en el bando leal.
Estuvimos discutiendo las posibles listas a llevar. Ya que los Hijos del Emperador iban a llevar una lista mecanizada yo decidí llevar una lista basada en bloques de infantería, para proporcionar apoyo con Fury of the Legion mientras sus tanques avanzaban a capturar objetivos. La lista de Guerreros de Hierro era mayormente de apoyo pesado y con un bombardeo orbital.

La táctica del otro bando se basaba en avanzar en cuatro bloques apoyados por el  Vindicator, Deredeo y un Bombardeo Orbital, y luego hacer un ataque quirúrgico sobre la parte mas débil con los exterminadores mediante Deep Strike y los Palatines en Rhino.
Despliegue
A continuación unas cuantas fotos del despliegue en el que se puede ver la escenografía.
El bando traidor desplegó primero y tuvo el primero turno.
La mesa resultó un pelín justa para 6000 puntos, era de 120x180cm, pero es la que tenemos.

El metro que está encima de la mesa mide el rango de alcance del Vindicator.

En su lado derecho desplegaron el Vindicator con el Master of the Signal para darle HP5, las tres motos, un Dread, una escuadra táctica y otra de termis.
En el otro lado, tres escuadras tácticas, la de plasma, el Deredeo y los Palatines en Rhino para avanzar por el flanco.
En su momento me pareció un despliegue raro ya que concentraron mucha tropa en un flanco y el otro quedó desprotegido.

Despliegue bando traidor flanco derecho
Despliegue bando traidor flanco izquierdo

En nuestro flanco izquierdo colocamos dos unidades básicas, el predator, un rhino y el apoyo pesado (termis y bólters pesados) para enfrentarse a sus motos. En el flanco derecho colocamos un Rhino, el Whirlwind, una unidad de lanzamisiles enfrentada al Deredeo, una de las unidades grandes tácticas y un Dread. En el centro colocamos la otra unidad grande, junto con un Dread y el Land Raider.
Sigo pensando que nuestro despliegue era mas equilibrado que el suyo y con posibilidad de bascular una unidad, un Dread y el Land Raider hacia un flanco en caso de peligro.

Despliegue bando leal flanco derecho
Despliegue bando leal flanco izquierdo

Turno 1

El bando traidor avanza toda da línea para llegar al asalto cuanto antes.
Hacen un Bombardeo Orbital sobre la unidad de lanzamisiles y una de las tácticas de 20. Las dos unidades echan cuerpo a tierra y sólo hay 3 bajas. El resto de disparos son mayoritariamente inefectivos.

Turno 1 bando traidor
En nuestro turno avanzamos toda la línea con vistas a ocupar posiciones para descargar un Fury of the Legion en el turno 2 a todo lo que avance. Hacemos también un Bombardeo Orbital, pero no resulta muy determinante.
Nuestros disparos son mas efectivos, causamos alguna baja entre los exterminadores que avanzan a pie, conseguimos matar una Scimitar que se retiran desmoralizadas y un punto de daño al Deredeo.

Turno 1 bando leal
Turno 1 bando leal

Turno 2

Las motos se reagrupan, las unidades tácticas avanzan excepto los Devoradores en el flanco izquierdo que deciden lanzar un Fury of the Legion, aunque estaban muy lejos.
Los disparos son mas efectivos en este turno y mueren casi todos nuestros exterminadores en el flanco izquierdo y la mayoría de los bólter pesados.
Los disparos del Deredeo destruyen el Whirlwind del flanco derecho. En el otro flanco el Rhino también es destruído por los disparos.

Turno 2 bando traidor
Sus exterminadores hacen Deep Strike en nuestro flanco derecho y se plantan delante de mi unidad con el Cónsul que estaba preparando un Fury of the Legion. Su Rhino con los Palatine avanza y se prepara para soltarlos al asalto.
Turno 2 bando traidor

En nuestro turno mantenemos la posición en el flanco derecho mientras que en el izquierdo avanzamos.
En el flanco derecho descargamos Fury of the Legion contra los exterminadores y contra la unidad de Hijos del Emperador del centro.
Los lanzamisiles destruyen el Deredeo. Es un Dread que cuesta muchísimos puntos para lo que hizo en la batalla, la verdad es que aunque la miniatura es espectacular fue una pérdida de puntos.
Lo mismo para el Dread con Twin-linked Autocannon, no hizo prácticamente nada.

Turno 2 bando leal
Turno 2 bando leal
Turno 2 bando leal
Los disparos del flanco derecho provocan que el Rhino explote y los Palatine escapan del vehículo destruido por detrás pero fallan el chequeo y quedan inmovilizados. La unidad táctica que iba en el Rhino del flanco sale para disparar contra los exterminadores.
En el flanco izquierdo todos los exterminadores de los Devoradores de Mundos sucumben a los disparos combinados de varias escuadras.
El turno dos termina sin asaltos.

Turno 2 bando leal

Turno 2 bando leal. ¡El Deredeo es destruído!

Turno 3

Es el turno decisivo.
Sin el apoyo del Deredeo y con un Vindicator no muy efectivo, todas las tropas disponibles avanzan y se inician los primeros asaltos.
Los exterminadores del flanco izquierdo cargan contra los Hijos del Emperador que salieron en el turno anterior, pero no consiguen arrasar a la unidad, pese a las bajas.
En el otro flanco, todo está perdido, salvo un Dread solitario que se acerca rodeando un edificio.
Turno 3 bando traidor
En nuestro turno avanzamos con todas las tropas que hicieron Fury of the Legion y el Dread del centro se acerca a los restos de la unida de Hijos del Emperador para descargar el Kheres y asaltar.
El flanco izquierdo avanza lo suficiente como para cargar a las motos, asalto que resulta en empate.
El Dread del flanco derecho carga al único exterminador que queda con vida y lo remata, consolidando en dirección a los Palatine.

Turno 3 bando leal
Turno 3 bando leal
El Dread del centro asalta a la unidad y resulta que el sargento no llevaba bombas de fusión, por lo que el combate es un paseo triunfal para el Dread, que no puede ser herido.
Un vistazo a la mesa nos muestra que sólo quedan con vida los Palatine y una unidad en el flanco derecho, en el izquierdo otra unidad táctica y dos motos. La batalla está decidida.

Turno 3 bando leal

Turno 4

Aunque no hacía falta jugarlo realmente, decidimos jugar un último turno.
El flanco izquierdo traidor carga contra los Hijos de Horus que resisten el asalto. Los Palatine finalmente cargan al Dread.
Turno 4 bando traidor
Los Hijos del Emperador pierden ambos asaltos pero no se retiran.

Turno 4 bando traidor
En el otro flanco las motos consiguen ganar el asalto en el que llevan desde el turno 3, gracias a que se suman al combate los restos de la unidad de Devoradores de Mundos. Pero ya no hay nada que hacer.

Turno 4 bando traidor
En nuestro turno simplemente nos dedicamos a rematar los asaltos.
Ambos Dread ganan los combates y en un Sweeping Advance rematan la unidad. El combate entre ambos bloques de infantería se mantiene igual, el resto de unidades avanzan y ocupan posiciones en la mitad de campo enemiga.

Turno 4 bando leal
Turno 4 bando leal
Una de las pocas tropas que sobreviven en el bando traidor es el Dread del flanco derecho, que sigue escondido detrás de un edificio, después de matar al Cónsul que le ha asaltado.

Turno 4 bando leal

Conclusiones

El resultado es una victoria total para el bando leal.
Mi ejército sufre muy pocas bajas, tan sólo la unidad de apoyo pesado desaparece, el resto siguen sobre la mesa. El ejército que ha absorvido la mayoría de las bajas son los Guerreros de Hierro.

En el otro bando han muerto todas las tropas tácticas excepto una unidad que está enzarzada en un asalto que no pueden ganar. Han quedado vivos dos Dread, dos motos y el Vindicator.

En resumen, otra batalla que confirma lo comentado en el anterior informe. Batallas cortas y sangrientas. Fury of the Legion sigue mostrándose como una baza decisiva, junto con los Dread, realmente duros en el asalto, que permiten arrasar unidades enteras con el Sweeping Advance.

Me quedé con las ganas de probar los Rhinos, asi que me he agenciado un Rhino que espero estrenar en la siguiente batalla con una unidad con rifles de plasma dentro. En realidad los Palatine tuvieron mala suerte, pero la técnica parecía la correcta.